Overhead cranes are the workhorses of modern industry, but even the most reliable equipment can suddenly refuse to cooperate. You check the power—lights are on, the control panel responds, yet the crane simply won’t start or behaves erratically. Before you call for expensive service or replace parts unnecessarily, consider this: it might be a false fault.
False faults occur when no component is actually damaged, but the crane fails to operate due to triggered safety interlocks, control logic restrictions, or minor mechanical interference. In this guide, we’ll walk you through the most common false faults in double girder overhead cranes, how to diagnose them step by step, and how to prevent them from recurring.

What Is a False Fault in an Overhead Crane?
A false fault is a situation where the crane refuses to operate not because a component is broken, but because:
- A safety interlock has been activated (e.g., an open door or gate)
- The control circuit logic prevents startup (e.g., handles not in neutral)
- The operator has overlooked a simple condition
- A minor mechanical obstruction is interfering with movement
False faults can affect any type of crane, including:
- Double girder overhead cranes
- Single girder cranes
- Underslung cranes (e.g., LX Suspension Single Girder Overhead Crane)
- Workshop and warehouse crane systems
Understanding these faults will help you get your crane back in action quickly—without wasting time or money.
Case 1: Crane Will Not Start – Safety Gate Not Fully Closed
Symptom
- Power indicator is ON.
- Control panel is active.
- Pressing the Start button does nothing.
Root Cause
Modern overhead cranes are equipped with safety interlock switches on:
- Cabin doors
- Hatch doors
- Walkway inspection gates
These switches use normally closed contacts wired in series with the main contactor coil circuit. If any door is open, the circuit breaks, preventing the main contactor from energizing and the crane from starting. This is a safety feature, not a fault.
How to Diagnose
1.Visually inspect all cabin and walkway gates—make sure they are fully closed.
2.Check alignment between the door and the switch actuator. A misaligned door may not depress the switch.
3.Test continuity across the interlock contacts with a multimeter.
Preventive Maintenance Tips
- Clean limit switch contacts regularly to remove dust and corrosion.
- Inspect hinges for wear or deformation that could prevent full closure.
- Replace worn mechanical switches promptly.
- Consider upgrading to inductive proximity switches for greater reliability.
Case 2: Zero Position Protection Failure
Symptom
- All safety gates are closed.
- Power is normal.
- The crane still will not start.
Root Cause
Overhead cranes are designed with zero position protection: before startup, the hoist handle, trolley handle, and bridge handle must all be in neutral (zero position). If any handle is not fully reset, the control circuit will not energize the main contactor.
In older cranes with cam controllers, the contacts can suffer from spring fatigue, poor contact, or failure to close reliably—creating an intermittent false fault.
How to Diagnose
1.Gently move each control handle while pressing the Start button. If the crane occasionally starts, the zero position contacts are suspect.
2.Use a multimeter to check continuity across the zero position contacts when the handles are in neutral.
Preventive Advice
- Inspect cam controllers every six months.
- Replace worn contacts with OEM parts.
- Adjust contact gaps to the manufacturer’s specifications.
- Train operators to always return handles to zero after use.
Case 3: Start and Stop Button Wiring Reversed
Symptom
- Crane powered, interlocks normal.
- Start button ineffective.
- Pressing STOP energizes the contactor; pressing START drops it out.
Root Cause
Standard crane wiring logic is:
1.Start buttons are wired in parallel.
2.Stop buttons are wired in series.
If the wiring is reversed during maintenance—especially after work by untrained personnel—the control logic becomes inverted.
How to Diagnose
1.Observe the contactor’s reaction to the start and stop buttons.
2.Open the pushbutton station and compare the wiring numbers with the circuit diagram.
Prevention
- Label wires clearly during any maintenance.
- Use color coding: green for Start, red for Stop.
- Always perform no-load logic testing after wiring changes.
- Consider adding intermediate control relays to simplify troubleshooting.
Case 4: Crane Cannot Lift Rated Load – Mechanical Binding Misdiagnosed as Electrical Failure
Symptom
- A 10-ton crane lifts only 5 tons.
- No electrical alarms.
- Motors appear to run normally.
Actual Cause
After repeated electrical inspections, the real issue turned out to be mechanical:
- A severely deformed fixed pulley guard
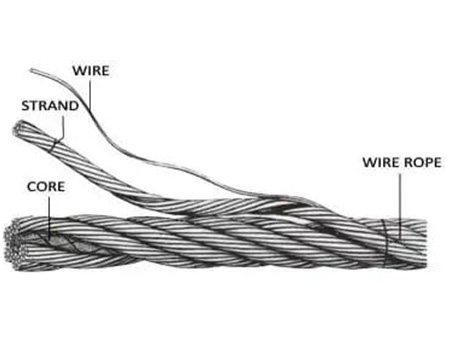
- Wire rope spooling interference
- Sheave jamming
These mechanical obstructions reduced lifting efficiency, yet maintenance teams kept looking for electrical problems. Overhead cranes are electromechanical systems—both electrical and mechanical components must be evaluated.
Mechanical Inspection Checklist
When electrical checks show no problem, proceed with a thorough mechanical inspection:
- Inspect wire rope alignment on the drum.
- Check drum spooling condition—ensure the rope winds evenly.
- Verify that sheaves rotate freely without binding.
- Inspect pulley guards for deformation or contact with moving parts.
- Check brake release clearance—a dragging brake can mimic an overload.
- Listen for abnormal noise during manual rotation.
- Check for resistance in the drivetrain by manually rotating components (with power off and safety lockout applied).
Complete Overhead Crane False Fault Troubleshooting Flow
Use this structured approach to quickly isolate the cause:
Step 1 – External Quick Check
- Safety doors – fully closed?
- Emergency stop button – pulled out?
- Zero position handles – all in neutral?
- Power phase presence – check for blown fuses or tripped breakers?
Step 2 – Electrical System
- Measure voltage balance between phases.
- Check contactor voltage drop when energized.
- Inspect resistor circuits for open paths.
- Review VFD or PLC alarms for error codes.
Step 3 – Mechanical System
- Check gearbox resistance – rotate by hand (if safe) to feel for binding.
- Inspect couplings for looseness or damage.
- Verify rope spooling – no cross winding or jamming.
- Inspect brake release – ensure it fully disengages.
- Examine guards and covers for contact with moving parts.
Best Practices to Reduce False Fault Downtime
- Check external components first before opening internal panels.
- Ask operators what happened just before the failure—they often provide the best clue.
- Understand the control logic before replacing parts.
- Balance electrical and mechanical inspection—don’t assume it’s always one or the other.
- Maintain regular preventive inspection schedules to catch minor issues before they become false faults.
Why False Fault Training Matters
For facilities without a full‑time maintenance engineer, understanding these common false faults is key to:
- Reducing downtime
- Preventing unnecessary spare part replacement
- Improving safety compliance
- Extending equipment lifespan
Whether you operate double girder cranes, single girder cranes, or underslung systems like the LX Suspension Single Girder Overhead Crane, systematic troubleshooting saves time and cost—and keeps your operations running smoothly.
About the Author
This guide was prepared by the technical team at [Your Company Name], specialists in overhead crane maintenance and safety training. With over 20 years of field experience, we help industrial facilities maximize uptime and safety.